Search

Sponser

Wednesday 31 October 2012

Linking to another page within your site


Creating links between pages is a necessary thing to be able to do when making a web site. Without links, the web wouldn't function, because there would be no way to get from one page to another on your site.
First of all, what you will need to do is create another page in your site. If you’re following the tutorials in order, then you’ve already created your other pages; in this lesson, you’ll create links between the pages you’ve created.
To link to another page within your site:


1. Select text or an image in your first 'index' page.
  • To select an image, click it one time.
  • To select text, double click the text box, move the mouse cursor over the text in the Text Editor.
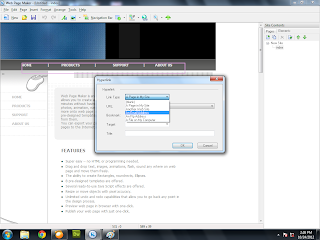
2. Click the "Hyperlink" button on the toolbar. A "Hyperlink" dialog box appears.
3. Select "A Page in My Site" from the Link Type pull-down box.


4. Click the arrow next to the URL drop box, a list of all current pages in the site will be displayed. Select one from the drop box.


5. (Optional) If you want to your specified page will be loaded in a new window, select _blank by clicking on the target area.
6. (Optional) If you would like to set a title of a link, type the description you want to display in the titel box. When viewing in a browser, if you hold the mouse pointer over the link, you may see a little yellow box with a brief description pop up below the mouse pointer.
Note: Links don't work when you click them in the work window; links work only in a browser. To make sure your link works correctly, you need to preview your page in a browser. For information on previewing, see Preview pages in a browser


Web Page Maker link editor


Web Page Maker makes it easy to include links on your web pages. The link editor is used for all linking functions, ie link to another page on your web site, link to pages on another web site, link to a file and email links. There are 5 sections in the Links Editor: Link Type, URL, Bookmark, Target and Title.

Link Type
Use this drop box to select the type of hyperlink to generate.

  • A Page in My Site: Links to a page within your site.
When you click the arrow next to the URL drop box, a list of all current pages in the site will be displayed so that you can select one from the drop box.
When you link to a page in the same site, the program will automatically maintain the link and make any changes that are necessary. If for example you change the name of a page, all links to it will also be updated. If a page is deleted, any links to it will be removed.

  • Another Website: Links to a another website.

When this link type is selected, type in your link following the http:// in the URL box.
  • An Email Address: Links to an Email Address.

When this link type is selected, type in your full email address following the mailto:. It will open the visitor's email program when clicked in a browser.
  • An FTP Address: File Transfers can sometimes be initiated with an FTP link. It is an agreed-upon method for transferring files between computers on the Internet. FTP addresses begin with "ftp://", as opposed to Web addresses, which begin with "http://".

  • A File on My Computer: Links to a file within your site.

When this link type is selected, click the Browse... button and select a file from your computer's hard drive, such as a .pdf file. When your site visitors click on this link, they will open or download the file you specify.
  • (Blank): Links to other type of hyperlink.

Select this link type to enter in your own custom link destination. This option is only recommended for advanced users.
URL
The URL drop box will contain the list of all links when the "Link Types" are selected. When the "A Page in My Site" link type is selected, the URL box will contain all the pages in the same site. If you are linking to another web site you will need to select the "Another Web Site" link type and enter the full URL. Type in your link's destination following the http://. You can either select a predefined link from the drop box or enter a new link.


Bookmark
A bookmark is usually used to create a local link to a specific location on a web page. A typical example is a link that says "Top" that will take the visitor from the bottom of the page to the top when pressed. For more information, see Creating bookmarks.
Target
The target option defines how the link will be open in browser window. The target frame names are _blank, _parent, _self, and _top. Use this pull-down menu to select where the link should open.
  • _blank     Link will open in new window.
  • _parent   Link will open in parent frame (if several levels deep). Equal to _top if only one level frame set.
  • _self        Link will open in current frame/window. This target is the default, so you usually don't need to specify it.
  • _top         Link will clear any existing frames and open URL as the uppermost document.
If you want to your specified document will be loaded in a new window, select _blank by clicking on the target area and click OK.
Title
This box contains the title or information about the link that will be displayed when the users mouse hovers over the link without activating it in a browser.


Wednesday 24 October 2012

Linking


A hyperlink is a page element (usually a word, button, or image) that "points to" another web page. When a visitor clicks the link in a web browser, the browser goes to the specified web page, which may be within the same web site, or in any other web site in the world.
URL
Each web page has a unique address, called a Uniform Resource Locator (URL). For web documents, the format of a URL is:
http://domain/directory/.../document.html
For instance, in http://www.webpage-maker.com/guide/index.html, "www.webpage-maker.com" is the domain, "guide" is a directory and "index.html" is the document filename. Often, the document filename is left out of the URL. In these cases, the URL points to the default document in the specified domain or directory, which is usually named "index.html".
URLs are typically used to link to documents that are on other web sites. For more information on URLs, see the World Wide Web Consortium website on naming and addressing at www.w3.org/Addressing/.
There are two basic forms of hyperlinks that are used in web documents: Absolute and Relative.
  • Absolute paths
Absolute pathsprovide the complete URL of the linked document, including the protocol to use (usually http:// for web pages). For example, http://www.webpage-maker.com/index.html is an absolute path.
  • Relative paths
A relative link refers to a document by a kind of shorthand, based on the location of the target document in relation to the one containing the link. An example of a relative link is "index.html".
When you create a local link (a link from one page to another on the same site), you generally don't specify the entire URL of the document you're linking to; instead, you specify a relative path from the current document or from the site's root folder.
Note: While you can also use absolute-path links for local links (to documents in the same site), that approach is discouraged - if you move the site to another domain, all of your local absolute-path links will break. Using relative paths for local links also provides greater flexibility if you need to move files within your site.
Your home page should be named index
A home page is the page a visitor will first see when visiting your site by entering your URL. On most sites this page will be called "index.html". Some sites may use a different name but most sites will allow you to use any one of these or other default names.
This is important because the first page of your website, the home page should be named index. 

Linking Pages

Monday 22 October 2012

Text link style sheet


If you don't do anything special to a link in an HTML document, it's probably going to appear in a sort of electric blue color, with the text underlined. This appearance is decided by the browser. But if that link appearance does not fit in with the designing of your page, you are going to be very interested in this recipe. Read on if you want to
  • Define your own text color for links
  • Get rid of the underlining
  • Give links a background color
  • Define your own appearance for links depending for when they have been visited, when the mouse is over them, or even while they are being clicked
You can use CSS style sheet to control how the text appears on your page. Define colors, fonts, backgrounds, and so much more. Making your own customized CSS Text Links now, give a whole new look to your pages!
To add a text link style sheet:
1. Select Text Link Style Sheet... from the Format menu.


2. Click the "Add" button in the Text Link Style Sheet dialog box. An Add Style dialog box appears.


3. Specify the text link style as your taste, and click "OK".

You may use the default name (style1) or rename it for the text link style.
Make sure the name of style does not contain any spaces.
4. Double click the text box on your page. Select text by moving the mouse cursor over the text in the Text Editor. And then the "Hyperlink" button on the Text Editor toolbar. A "Hyperlink" dialog box appears.


5. Select a style you have created from the Text Link Style pull-down box at the bottom of the "Hyperlink" dialog box.


The first style list in the Style drop-down menu is the default style. You can change your linked texts to other style you have created by selecting other style from the Style pull-down box.
This tool will work in Internet Explorer and Netscape 6X browsers. Netscape 4X browsers do not fully support CSS Text. 

Inserting an iFrame


An iFrame is a construct which embeds a document into an HTML document so that embedded data is displayed inside a subwindow of the browser's window. Iframe functions as a document within a document.
To insert an iFrame:
1. Select Insert > iFrame.


2. You can either use the "Browse" button to find an external html file to embed.

Or, embed a page from the current pages on your site by clicking the 'Internal Page' radio button and selecting one from the drop-down list.

Adding html code


To add HTML to a web page:
1. Select Html Code or Script Code... from the Insert menu.

2. Type or paste your HTML into the HTML Editor window.
You may paste HTML code by clicking inside the HTML Code dialog and pressing Ctrl-V on your keyboard.

3. Click OK.
4. Be sure that the html code object you add to a web page is large enough to accommodate the HTML content it includes. To enlarge an html code object, click on one of its resize handles and drag it to the appropriate size.
Note: If the snippet of code you are using is non standard or incorrect, Web Page Maker will not automatically correct it.

Adding publish file


This option is used to upload a file to your server when you publish but not have it embeded into the page. In other words, the file cannot be viewed directly in the preview mode, but it is a part of your page. With this function, you do not need additional FTP programs to upload this file.
For example, if you would like to add a favicon to your website, first select Html code or script code from the Insert menu, type or paste the code below in the Html Editor window:
<link REL="SHORTCUT ICON" HREF="favicon.ico">
Then, you should upload the "favicon.ico" to your web hosting.
To insert a publish file to a web page:
1. Select Insert > Add-ons > Publish File...

2. Click the Add button, and select the file you want to publish from your hard drive.
3. Click OK.
When publishing, the publish file will be uploaded to your web host automatically. 

Sunday 21 October 2012

Adding a PayPal View Cart Button


You need to create only one View Cart button, regardless of the number of Add to Cart buttons that you create and add to your website.
To add a PayPal View Cart Button to your web page:
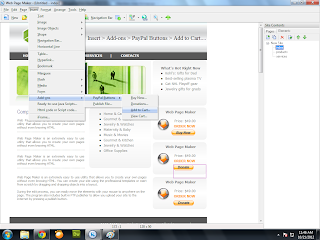
1. Select Insert > Add-ons > PayPal Buttons > View Cart.

2. Click the General tab, enter the email address to which you want payments to be sent in the PayPal Account field.
If you already have a PayPal account, be sure to enter the email address associated with that account here; if you do not yet have an account, sign up now. This field is required.
3. Choose a button to put on your website.
    If you want to choose a button to place on your website, click the Browse... button. You can choose a button from the built-in image library or from your local hard drive.
    Other types of buttons include:

    Adding a PayPal Add to Cart Button


    With the PayPal Shopping Cart, you can let buyers select multiple items on your website and pay for them with a single payment. Buyers click Add to Cart buttons to add items to their virtual PayPal Shopping Carts, and they click View Cart buttons to review the items in their carts before they check out and make their payments.
    To add a PayPal Add to Cart Button to your web page:
    1. Select Insert > Add-ons > PayPal Buttons > Add to Cart.

    2. Click the General tab, enter the email address to which you want payments to be sent in the PayPal Account field.
    If you already have a PayPal account, be sure to enter the email address associated with that account here; if you do not yet have an account, sign up now. This field is required.
    3. Enter the details of the item you wish to sell below:
    • Item Name/Service -- Enter the name of your item. Your customers will see this name associated with the item in their transaction details on the PayPal website.
    • Item ID/Number -- If your item is associated with a product identification number or code, enter it here. Your customers will see this ID associated with the item in their transaction details on the PayPal website (Optional).
    • Price -- Enter the price of your item here, and choose the currency in which the price should be listed from the pull-down menu.
    • Shipping -- Enter the cost of shipping this item (Optional).
    • Tax -- Enter the tax price for the item in this field (Optional). 4. Choose a button to put on your website.
    If you want to choose a button to place on your website, click the Browse... button. You can choose a button from the built-in image library or from your local hard drive.
    5. For additional item options, click the Customize tab (Optional).
    • If you'd like to use your own transaction confirmation page, enter the URL (web address) of another confirmation page in the Confirmation page field.
    • If you'd like to use your own transaction cancellation page, enter the URL (web address) of another cancellation page in the Cancellation page field.
    • If you'd like to make it possible for your customers to purchase more than one of this individual item, check the "Allow customer to specify quantity on PayPal payment page" check box.
    • If you'd like your your customer to provide a shipping address, check the "Prompt for shipping address" check box.
    • If you'd like your customer to be able to send you a note with his payment, check the "Prompt the customer for a note" check box, then enter a title for this field next to Note Title.
    After creating your Buy Now buttons, you can put them on your website to start selling.
    Other types of buttons include:

    Adding a PayPal Donations Button


    To accept donations, put a Donate button on your website. Donors can then click the button to make donations.
    To add a PayPal Donations Button to your web page:
    1. Select Insert > Add-ons > PayPal Buttons > Donations.

    2. Click the General tab, enter the email address to which you want payments to be sent in the PayPal Account field.
    If you already have a PayPal account, be sure to enter the email address associated with that account here; if you do not yet have an account, sign up now. This field is required.
    3. Enter the details of the item below:
    • Item Name/Service -- Enter the name of your item. Your customers will see this name associated with the item in their transaction details on the PayPal website.
    • Item ID/Number -- If your item is associated with a product identification number or code, enter it here. Your customers will see this ID associated with the item in their transaction details on the PayPal website (Optional). 4. Choose a button to put on your website.

    If you want to choose a button to place on your website, click the Browse... button. You can choose a button from the built-in image library or from your local hard drive.
    5. For additional item options, click the Customize tab (Optional).

    • If you'd like to use your own transaction confirmation page, enter the URL (web address) of another confirmation page in the Confirmation page field.
    • If you'd like to use your own transaction cancellation page, enter the URL (web address) of another cancellation page in the Cancellation page field.
    • If you'd like to make it possible for your customers to purchase more than one of this individual item, check the "Allow customer to specify quantity on PayPal payment page" check box.
    • If you'd like your your customer to provide a shipping address, check the "Prompt for shipping address" check box.
    • If you'd like your customer to be able to send you a note with his payment, check the "Prompt the customer for a note" check box, then enter a title for this field next to Note Title.
    After creating your Donate buttons, you can place them on your website to start raising funds.
    Other types of buttons include:

    Adding a PayPal Buy Now Button


    To let your customers buy one item at a time, put a Buy Now button on your website. Your customers can then click the button to buy an item.
    To add a PayPal Buy Now Button to your web page:
    1. Select Insert > Add-ons > PayPal Buttons > Buy Now.

    2. Click the General tab, enter the email address to which you want payments to be sent in the PayPal Account field.
    If you already have a PayPal account, be sure to enter the email address associated with that account here; if you do not yet have an account, sign up now. This field is required.
    3. Enter the details of the item you wish to sell below:
    • Item Name/Service -- Enter the name of the item or service that you wish to sell. Your customers will see this name associated with the item in their transaction details on the PayPal website.
    • Item ID/Number -- If your item is associated with a product identification number or code, enter it here. Your customers will see this ID associated with the item in their transaction details on the PayPal website (Optional).
    • Price -- Enter the price of your item here, and choose the currency in which the price should be listed from the pull-down menu.
    • Shipping -- Enter the cost of shipping this item (Optional).
    • Tax -- Enter the tax price for the item in this field (Optional). 4. Choose a button to put on your website.

    If you want to choose a button to place on your website, click the Browse... button. You can choose a button from the built-in image library or from your local hard drive.
    5. For additional item options, click the Customize tab (Optional).

    • If you'd like to use your own transaction confirmation page, enter the URL (web address) of another confirmation page in the Confirmation page field.
    • If you'd like to use your own transaction cancellation page, enter the URL (web address) of another cancellation page in the Cancellation page field.
    • If you'd like to make it possible for your customers to purchase more than one of this individual item, check the "Allow customer to specify quantity on PayPal payment page" check box.
    • If you'd like your your customer to provide a shipping address, check the "Prompt for shipping address" check box.
    • If you'd like your customer to be able to send you a note with his payment, check the "Prompt the customer for a note" check box, then enter a title for this field next to Note Title.
    After creating your Buy Now buttons, you can put them on your website to start selling.
    Other types of buttons include:

    What is PayPal?


    PayPal is an e-commerce business that allows members to send money online quickly and safely to anyone with an email address. Once you sign up for a free account, you can use PayPal to send and receive online payments with credit card or bank account.
    You can use PayPal Buttons to let your site visitors purchase individual items on your site. When a visitor clicks a PayPal button on your site, a new window will open containing a PayPal payment details page. Here he'll be prompted to sign in to an existing PayPal account or sign up for a new one, then complete his transaction on the PayPal web site.
    If you receive a payment through PayPal, you will receive an email notification and the money will be credited to your PayPal account. You can then use your PayPal balance to make payments, or you can withdraw the funds to your bank account.
    Let's see how customers pay:

    Customer shop on your site And Click the payment button   >    They Pay on paypal secure Pages   >   and return to your site after payment.


    Add any of the following buttons to your site:

    Sell single items in various quantities with Buy Now button

    Sell multiple items at one time with Add to Cart button

    Accept monetary contributions with Donate button

    Review the items in carts before checking out with View Cart button

    Example - Email Form


    The example form is a standard email form. By default, when a visitor fills out the form and clicks the submit button, the default browser tells him it's sending the data via email, and then sends it automatically (without opening up a mail client).
    To add an email form:
    1. Select Insert > Form > Example - Email Form.


    2. A form and a set of form elements appear. Double click the form (a picture named form), replace contact_us07@yahoo.com with your own email address in the action box.


    3. Click Ok.
    If you want a more powerful email form which suits your needs, you need a server side script like FormMail.cgi or find some form server provider. You should contact your web host for instructions on how to access their server side programs and if they provide such .cgi program.

    Inserting a hidden form field


    A hidden field is used to store a static value that is sent to the server along with the rest of the information in a form. However, it is invisible to the visitor. You might use a hidden field, for instance, to send the filename of the document containing the form.
    To add a hidden form field:
    1. Select Insert > Form > Hidden Form Field...

    2. Double click then enter a Name to identify the hidden form field.
    3. Enter the Value that will be sent to the server.

    4. Click OK.
    In the work window, a hidden form field is indicated by with a picture that looks like this:
    This picture is not visible in a browser or the Preview window.  

    Inserting an image button


    An image form element is an image that acts as a kind of submit button in a form. Like a standard submit button, when clicked, it causes the information in the form to be sent to the Web server.
    To insert an image button:
    1. Select Insert > Form > Image Button... 

    2. Locate and select an image file on your local drive, and click open
    3. Double click the image button, enter a name to identify the image button in Name.

    4. Click OK.
    5. If you wish to attach an action, select Insert > Form > Form. Then make the form element is belonged to the form.
    Note: If you add the form in the first, then the form elements, the form elements are belonged to the form you have added automatically. 

    Inserting a push button


    A push button allows the site visitor to give the web browser a command regarding the form, such as "Submit this form now". Sometimes, a button is used in combination with a JavaScript action that performs some function when the button is clicked.
    To add a push button:
    1. Select Insert > Form > Push Button...

    2. Double click then enter a name to identify the button in Name.

    3. In Value, enter the text to use as the button's label. If the button type is submit, this value is also sent to the server.

    4. Select a Button type.
    • If you set the type to Submit, the button will cause the values in the form to be sent to the server.
    • If you set it to Reset, the button will cause the form to be cleared.
    • If you set it to General, the button doesn't do anything by itself; it needs to have an attached JavaScript action that performs some function when the button is clicked.
    5. Click OK.
    6. If you wish to attach an action, select Insert > Form > Form. Then make the form element is belonged to the form.
    Note: If you add the form in the first, then the form elements, the form elements are belonged to the form you have added automatically. 

    Inserting a drop-down list


    A drop-down menu is used in a form, and allows a site visitor to select an item from a list.
    To add a drop-down list:
    1. Select Insert > Form > Drop-down List...

    2. Click Add.

    3. In the Add Option dialog box, enter Text and Value and click OK.
    • Text: Enter the text of the item that will appear in the menu when viewed in a browser.
    • Value: Enter the value that will be sent to the web server when a site visitor selects the item.
    You can write the option values to meet your needs, i.e., type the page's URL using a relative path in the Value box (e.g. page2.html).
    4. If you wish to attach an action, select Insert > Form > Form. Double click the main form, enter action in the Action box to apply any actions. Then make thedrop-down list is belonged to the form.
         Note: You will need an html code to make the drop down list to work. Select Html Code or Script code from the Insert menu, paste the code below into the Html Editor window:


    <script language="javascript">
    function gotoUrl(url) {
    if (url == "")
    return;
    location.href = url;
    }
    function newWin(url) {
    // url of this function should have the format: "target,URL".
    if (url == "")
    return;
    window.open(url.substring(url.indexOf(",") + 1, url.length),
    url.substring(0, url.indexOf(",")));
    }
    function fnOnChange(){
    gotoUrl(selector.options[selector.selectedIndex].value);
    return true;
    }
    var selector = (document.getElementById)? document.getElementsByName("formselect1")[0] : document.all.formselect1;
    selector.onchange=fnOnChange;
    </script>

    Recommeded Links